
Key Roof-Only Insulation Installation Considerations for Homeowners
Insulating only the roof portion of your home can be a smart move—especially if you’re dealing with finished attic rooms, cathedral ceilings, a bonus room over a garage, or a retrofit where opening up walls isn’t realistic. Done well, roof-only insulation can cut heat loss, improve comfort, and reduce HVAC strain without the disruption of a full-envelope upgrade.
But it’s also one of the easiest places to get tripped up. Roof assemblies manage heat, moisture, and airflow in a tight, highly exposed space. Change one variable—say, you add insulation but leave ventilation unchanged—and you can accidentally create condensation, mold risk, or even shorten the life of your roof.
Before you commit, it’s worth reviewing the most common roof-only insulation installation considerations and how they differ from insulating a standard attic floor. If you want a practical primer on the tradeoffs and typical installation approaches, this resource on roof-only insulation installation considerations is a helpful reference point to frame the decisions you’ll make with your contractor.
Start With the Roof Assembly: Vented vs. Unvented
The first question is deceptively simple: is your roof designed to be vented, or will it become an unvented “hot roof” assembly?
Vented assemblies (traditional approach)
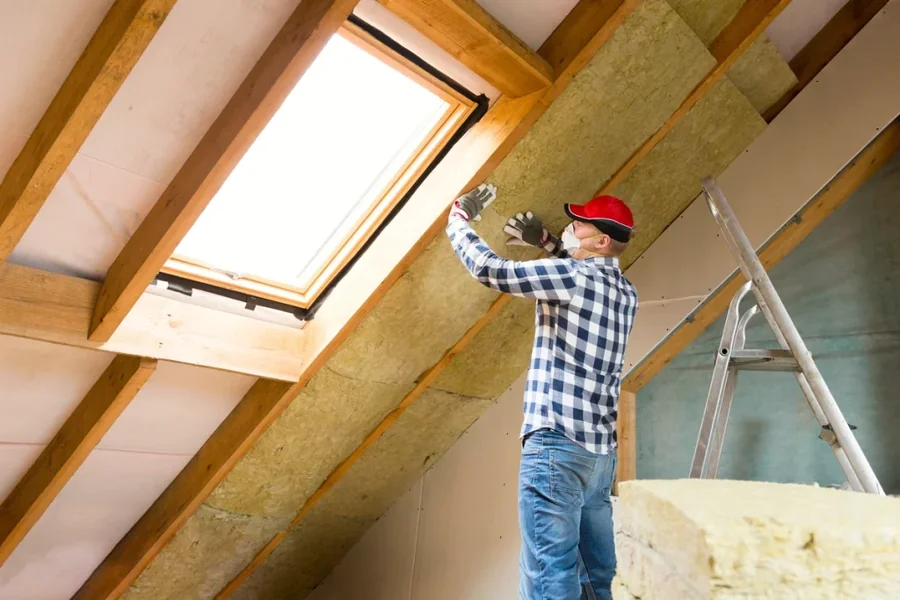
A vented roof relies on airflow from soffit to ridge (or other high-point vents) to flush out moisture and reduce roof-deck temperatures. If you insulate below a vented roof deck, you must preserve a continuous ventilation channel above the insulation. That usually means baffles or site-built chutes in each rafter bay.
Miss one bay, compress insulation into the air channel, or block soffit vents with insulation, and performance drops fast. In cold climates, that’s when ice dams and condensation problems start showing up.
Unvented assemblies (common in retrofits and complex roofs)
An unvented roof can work extremely well, but it must be designed intentionally. Typically, you’re controlling moisture by using an air-impermeable insulation layer (often spray foam) at the roof deck, or a hybrid approach that keeps the roof deck warm enough to avoid condensation. Building code usually sets minimum R-values for the exterior/air-impermeable portion depending on climate zone.
The key takeaway: you can’t just “add insulation” without deciding which roof strategy you’re implementing.
Moisture Control: The Real Make-or-Break Detail
Heat loss is obvious; moisture movement is not. Yet most roof insulation failures are moisture-related.
Air leaks beat diffusion—every time
Warm indoor air leaking into cold roof cavities is the classic recipe for condensation. Even small gaps around recessed lights, wiring penetrations, bath fan housings, or top plates can move enough moisture to wet roof sheathing.
Prioritize air sealing before (or as part of) insulating. If your installer isn’t talking about air barriers, ask why.
Vapor retarders must match the assembly
Homeowners often hear “add a vapor barrier,” but it’s not universally correct. The right vapor control layer depends on climate, insulation type, and whether the roof is vented.
In some cases, an overly restrictive interior vapor barrier can trap moisture that needs to dry inward. In other cases, you need a vapor retarder to slow inward winter vapor drive. The best approach is assembly-specific, not generic.
R-Value Targets and Thermal Bridging in Rafters
Roof-only projects often occur in shallow rafter spaces—2×6 or 2×8 framing—where it’s hard to hit modern R-value targets without additional steps.
Don’t ignore thermal bridging
Even if you perfectly fill rafter bays, the rafters themselves conduct heat. In roof assemblies, this “striping” can reduce effective performance and create cold lines where condensation is more likely.
If you’re renovating the interior ceiling plane, consider adding a continuous layer (like rigid foam or insulated panels) beneath the rafters to reduce bridging. It can also improve comfort by raising interior surface temperatures.
Ventilation and Indoor Air Quality: Bathrooms, Kitchens, and Combustion
Roof-only insulation can change how your house “breathes.” That’s good when it reduces drafts—but it also means you need to confirm mechanical ventilation and exhaust pathways are correct.
Exhaust fans must vent outdoors
This is non-negotiable. Bath fans dumping into a roof cavity are a moisture disaster waiting to happen, and tighter assemblies make the consequences faster and more severe.
Watch for combustion safety
If you have atmospheric combustion appliances (like older furnaces or water heaters), tightening the building enclosure can affect draft and backdraft risk. A contractor may recommend combustion safety testing or upgrades to sealed-combustion equipment.
Installation Practicalities: Access, Detailing, and Roof Geometry
Roof-only insulation is rarely a clean, rectangular space. Valleys, dormers, hips, skylights, and intersecting rooflines create short bays and dead pockets that are hard to insulate consistently.
Here’s a simple field-minded checklist you can use with your installer (and it’s the only “list” you really need):
- Confirm the roof will be vented or unvented, and detail how that’s achieved.
- Identify the continuous air barrier and how penetrations will be sealed.
- Specify how soffit and ridge vents (if used) will remain unobstructed.
- Ask how the plan handles tight corners and short rafter bays.
- Verify bath/kitchen exhaust ducts are sealed, insulated, and vented outside.
If an installer can’t answer these clearly, pause the project. The details matter more than the product label.
Fire Safety, Code Compliance, and Re-Roof Timing
Roof insulation touches code requirements that vary by location, especially around ignition barriers, thermal barriers, and venting rules.
Interior finish requirements
Certain insulation types require a thermal barrier (often 1/2-inch drywall) when installed on the interior side of living spaces. In attics used for storage or service access, ignition barrier rules may apply. These aren’t “optional upgrades”—they’re safety requirements.
Coordinate with roofing work when possible
If a re-roof is planned soon, that’s your chance to consider exterior insulation above the roof deck. Adding rigid insulation above the sheathing can dramatically reduce thermal bridging and improve condensation control, especially for unvented assemblies. It can also allow higher R-values without sacrificing interior headroom.
Choosing the Right Approach for Your Home
Roof-only insulation can be a high-impact comfort upgrade, but it’s not a one-size-fits-all job. Success comes down to aligning four things: the roof’s venting strategy, air sealing continuity, moisture control layers, and realistic R-value targets for your framing depth and climate.
If you’re unsure where to start, ask your contractor to describe the roof assembly as a system, not a material choice. When the plan accounts for airflow, water vapor, and heat transfer together, the insulation will do what you want it to do: make the space quieter, more comfortable, and less expensive to condition—without introducing hidden risks above your ceiling.